Prototyping with Modbus


Are you prototyping, or looking for an affordable way of measuring humidity and temperature in your application without compromising the quality of the measurements? Do you also have some basic knowledge about programming languages, such as Python? If so, I hope to show how you yourself can easily log data for extended periods of time with just an HMP110 probe, a USB service cable (219690), and a computer with Python 3 installed. I’ll walk you through the different sections of the code but if you don’t care for an explanation, you can skip to the bottom for the entire code. I would also like to point out that this is only an example script demonstrating Modbus communication.
Libraries
Before we get to the code, let’s first introduce the libraries that we will take advantage of, the most important one being pymodbus. We use it to communicate with the probe via Modbus RTU, we will more specifically import ModbusSerialClient from pymodbus.client.sync. We use the struct library to manipulate bits into different variable types, the time library to change the poll rate, the datetime library to get the time and date for the data readings, and we import argparse to pass arguments from the command line to the code.
from pymodbus.client.sync import ModbusSerialClient as ModbusClient
import struct
import time
import datetime
import argparse
Parameters
I have added some arguments to help with the flexibility of the code. We use these so that we can easily change the values of the variables from the command line without having to alter the code. The arguments that I thought might be useful are the communication port, the name of the file where the data is stored, the slave address of the probe, the poll rate, and the data logging length.
parser = argparse.ArgumentParser(
description="Modbus data logger"
)
parser.add_argument('port', help="The COM port where the probe is attached")
parser.add_argument('-f', '--file', help="The file name to store the data (default data.csv)", default="data.csv")
parser.add_argument('-a', '--address', help="The address of the probe (default 240)", default=240, type=int)
parser.add_argument('-r', "--rate", help="The poll rate in seconds (default 1)", default=1, type=float)
parser.add_argument('-l', '--length', help="The length of time in hours to data log (default 9999999)", type=float, default=9999999)
args = parser.parse_args()
Modbus connection
We first need to initialize a new serial Modbus client with the correct settings for our probe. The set of parameters in this example must include the method of communication, the communication port, the response timeout, the baud rate, the stop bits, and the parity. The method is ‘rtu’ for Modbus RTU, the port depends on your computer so I will explain in a section below, how to identify the correct one. The other parameters are determined by the probe’s settings so you will need to reference its data sheet for the appropriate values. Typically for the Vaisala probes, the baud rate is 19200, the stop bits are 2, and the parity is none.
probe = ModbusClient(method='rtu', port=args.port, timeout=1, baudrate=19200, stopbits=2, parity='N')
Reading the holding registers
Let’s now create a function to read the holding registers of the probe. We call the read_holding_registers() method of the Modbus client instance we created in the previous section to read the registers. We need to specify the starting address of the holding register, the number of registers and the slave address of the probe. We will receive the data from the registers in 16-bit words in little-endian format, which we must then convert into 32-bit floating point values.
def holding_registers_data():
try:
registers = probe.read_holding_registers(address=0,count=10, unit=args.address).registers
except Exception as e:
print(e)
return False, None, None, None
try:
rh = data_from_register(registers, 1)
t = data_from_register(registers, 3)
dp = data_from_register(registers,9)
except Exception as e:
print(e)
return False, None, None, None
return True, rh, t, dp
Converting the registers into 32-bit values
The registers are stored as 16-bit integers, and we need to convert them to 32-bit floats. I created a function that takes the register values and the register index, and returns a 32-bit floating point value of the data at that index. We make use of the module struct to perform this conversion
def data_from_register(registers, i):
return struct.unpack('!f', bytes.fromhex('{0:04x}'.format(registers[i]) + '{0:04x}'.format(registers[i-1])))[0]
Logging the data
Now that we can read the holding registers and convert the values into 32-bit floating point values, we need to create a function that stores the values in a .csv file. I have created a function called data_logger() for that purpose. It calls the function holding_registers_data() and appends the received data to a file in the format date time, relative humidity, temperature, dew point.
def data_logger():
probe.connect()
successful, rh, t, dp = holding_registers_data()
if (successful):
dt = datetime.datetime.now()
try:
with open(args.file, "a") as f:
line = f"{dt},{rh},{t},{dp}\n"
print(line)
f.write(line)
except Exception as e:
print(e)
probe.close()
time.sleep(args.rate)
else:
probe.close()
time.sleep(0.5)
Determining the communication port of the probe
First, make sure your probe is correctly connected to your computer.
Windows
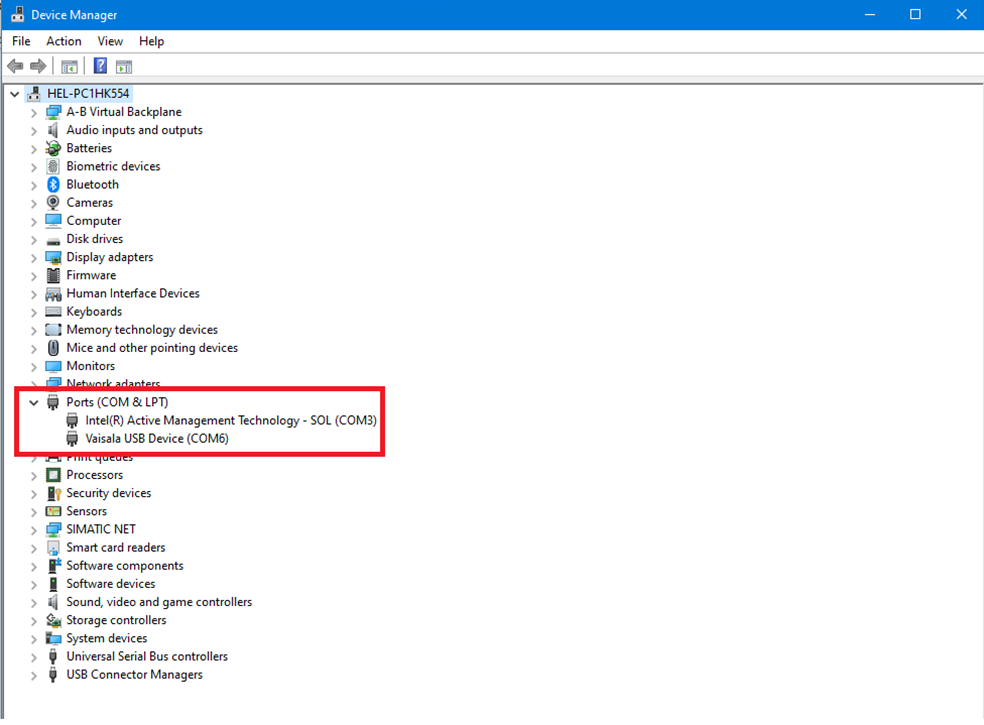
In the Windows operating system, you can find the COM port of the device under Device Manager. To open the Device Manager window, open the Start Menu at the bottom left of the screen and type in “Device Manager”. It should appear as the top result under “Best match”, open it by clicking on the icon or by pressing Enter on your keyboard. Click on the arrow next to Ports (COM & LPT) to expand the ports. There should be a device listed as “Vaisala USB Device” with the COM port listed next to it, in our case COM6.
Linux
In Linux you can determine the communication port by typing the command “dmesg | grep tty” in the terminal. It should return, among other things, a statement similar to 'cp210x converter now attached to ttyUSBn', where ttyUSBn is the port.
Running the code
In order to run the script, you must have all of the libraries installed. If needed, you can use the pip command
pip3 install -U pymodbus
to install pymodbus. The other libraries should already come with the python 3 package.
In a command prompt, navigate to the directory where they python script is stored and type
python Modbus_RTU -h
for help with the arguments. This should show up in the command prompt. Below is a screenshot of the output.
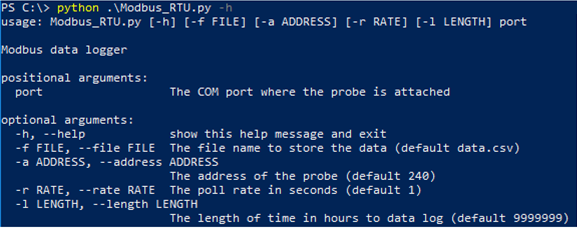
The only parameter that is required is the communication port, while the other arguments have a default value which can be changed according to your preferences. The communication port argument requires no identifier and can be placed anywhere after the file name. The other arguments which are optional, require an identifier.
Here is an example of a typical command in long and short form:
Python .\Modbus_RTU --file datalog.csv --address 240 --rate 10 --length 48 COM6
Python .\Modbus_RTU -f datalog.csv -a 240 -r 10 -l 48 COM6
Download the entire code and Watch the Modbus 101 webinar.

Comment
Add new comment